Sunday, April 24, 2011

Sleeping Baby Pictures by a Creative Mom

From: http://milasdaydreams.blogspot.com/


Install Cert on Cisco Router/Switch

If you have internal MS PKI server, you can install your own cert on Cisco routers and switches for SSH or HTTPS access. In addition to manually installation, you might need to download SCEP add-on for your certification services for auto enrollment. Here is the download link:
http://www.microsoft.com/downloads/en/details.aspx?familyid=9f306763-d036-41d8-8860-1636411b2d01&displaylang=en

Here is a sample code that you will need on your Cisco gear:

ip domain-name xxxx.com
ip domain-lookup
crypto ca trustpoint yyyy
enrollment url http://zzzz/certsrv/mscep/mscep.dll
enrollment retry count 3
enrollment retry period 5
fqdn hostname.xxxx.com
exit
crypto ca authenticate yyyy
crypto ca enroll yyyy

where:
xxxx.com is your domain name
yyyy is your trustpoint/CA Server Name
zzzz is the CA server name of the CA enrollment URL
hostname is the DNS name of your router or switch

You will need to enter a few Yes or No and a password for the last two commands. You will also need to make sure the time on the Cisco gear and PKI server are synced with NTP server. Your DNS server should have an A-record for the gear.

Thursday, April 21, 2011

Aruba Y Cable Pin layout


If you work with Aruba Wireless Access Point, then a Aruba Y cable could be a good troubleshooting tool for you. One end of the Y cable looks like regular female RS232/DB9 port. The other end looks like two Ethernet cable with RJ45 connectors. You will need to plug one RJ45 connector to an AP, the other RJ45 connector to a POE switch port, and the serial connector to your PC's serial port. From a Putty session, you can see all the traffic between the AP and your network.

Here is a diagram of the Y cable's pin layout if you want to make one yourself. You will need a short Ethernet patch cord (568B at both ends) and a female DB9 adapter kit.

Carefully cut open the sleeve of the patch cord in the middle, cut open the blue, white/blue, brown, and white/brown wires, strip off the plastic cover on those wires, and wire them to pin 2, 3, & 5 from inside of the DB9 connector as shown at the bottom of the diagram - white/blue and brown wires are both connected to pin 5. The White/Orange, Orange, White/Green and Green should be untouched ans still connected to both end of the RJ45 Connectors. I erased the other 4 wires at the network end of the connector in the diagram. But in reality, they are still there, just being cut.

In one case I need to use the Y cable is one AP would not show up in master controller after been configured as a mash point. Using the cable, I was able to see the boot process and the behavior of the AP after the boot process. That provided enough information to google and find solution, which is break the boot process by press Enter key in a 2-5 seconds time window, then enter "purge" and "save" command and reboot the AP.

Friday, April 8, 2011

Install CallManager Express on a Router with limited Flash

The flash size on my old 2600MX is too small to install CME 4.3, even the basic version. BTW, the full version of CME contains additional files and folders for Auto Attendant & Auto Call Distribution, display images for phone's LCD screen, ringtones, and firmwares for additional phone models. The firmware files are large compare to the rest of the files. Because I only have one model of Cisco IP phones in my lab, I removed most of the firmwares before I load the CME to the router. Here are the steps:

1. Extract the cme-full-4.3.0.0.tar file to the tftp root folder as "cme"
2. Delete some of the firmware folders in "cmd\phone" folder.
3. Delete some of the png files from "cme\Desktops\320x212x12". You might need to edit the List.xml accordingly.
4. Delete CME43-full-readme-v.2.0.txt from "cme" folder. Now the CME size reduced to ~9 MB.
5. From the "cme" folder, select all the files and compress them to tar format. You will need 7zip for this and it can be downloaded from http://www.7-zip.org/


The "CME43-full-readme-v.2.0.txt" contains detailed installation and basic configuration procedure to load CME onto a router and I won't repeat it here. There are many tutorials cover the same topic and some post configuration. Here is a good one: http://www.brainbump.net/tutorials/voice/CMEusingGNS3.htm

You can manage CME using CLI or GUI. For GUI, you can use either IE or Cisco Configuration Assistant.
Here is a good book to learn CME: "IP Telephony Using CallManager Lab Portfolio".

Thursday, April 7, 2011

APC UPS

This is not a promotion for APC. We just installed over a dozen UPS in our MDFs this week. While I am still recovering from sour back, I would like to share some basics about the product and hope this will be useful to someone out there.

To keep our core networking devices up for certain amount of time in the event of power outage, we purchased APC Smart-UPS 2200XL and additional battery pack. The purchase is based on the power consumption of the core devices and the desired up time. Power consumption can be found from your networking device vendor site. This run time chart will help you pick the size and model of UPS unit.

2200XL UPS uses NEMA5-20P input plug. The NEMA5 is for the plug type. The 20 is for the AMP and the P is for plug. This plug will require a matching receptacle - NEMA5-20R.

You will need to take the batteries out of the UPS before mounting it to the rack. See following two diagrams from the user manual for detailed installation procedure:
Diagram 1

Diagram 2


One thing to note here is the first battery I pulled out, is not connected to the main unit and the connector is sealed.

In addition to the serial/management port, the UPS comes with a network management card and allow you mange the device remotely. Here is a diagram for the card:


This AP9361 has a special console port. It looks like a mini headphone jack - marked as item 6 in the picture above. The default baud rate of the port is 9600. There is another built-in regular RS232/serial port on the UPS, which can also be used to manage the device and its baud rate is 2400. The unit shipped with both types of console cables.

By default, it might get an IP via DHCP. I prefer to assign a static IP so that I know exactly where to locate the device. To do so, I use the regular console cable comes with the device and configure Hyper Terminal port as shown below. If you use the special console port on the AP9631 card, you can use any terminal program with default baut rate of 9600:


The default user name and password is "apc" & "apc". Here is a list of command available after you logged in and enter question mark:


You will need to use "tcpip" for ip version 4 assignment and "reboot" to apply setting.

You can change other settings from console port, but it is much easier to do it from Web interface. Enter the IP address in a browser and once again, use "apc" as user name and password.

The first thing I did is enable HTTPS as shown. There should be a build-in cert on the device. You can also import your own cert.


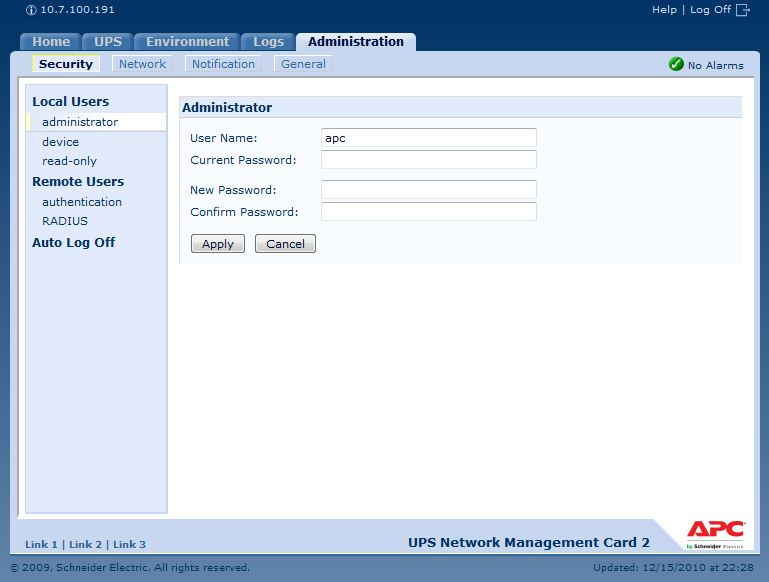
Next, change default admin login name and password:


You might need to recover a lost password in the future. Here is instruction from user guide:

Please note, if you the RS232 port on the UPS, your baud rate will be 2400..

Here are a few screenshots of the features you can configure on the device:


The Port 1 Temp 1 in the above picture is the temperature sensor. It can monitor the MDF room temperature and it is plugged into the first sensor port. Here is a picture of the sensor: